Save Submitted Data to Table(s)
- Save Submitted Data to Table(s) Action Properties
- Using the 'Save Submitted Data to Tables' Action in Connection With Security
- Build the Component in the Validate Web Security Values Guide
- Change The Security Table Type to SQL
- Minor Adjustments to Security Controls
- Add a Personal Data Section to the Component
- Data Binding
- Implement the 'Save Submitted Data to Tables' Action
- Viewing the Entered Personal Data
Description
Save the submitted data to one or more tables.
In order to define a 'Save Submitted Data to Table(s)' action it is necessary to first add Data Binding to the component, meaning that the component must be tied to a either a SQL or DBF table defined on the server. The process of adding this action to a server-side event on a data-bound component is described on the "Bind the controls on your UX to fields in one or more existing tables" page in the Data Binding section of the documentation.
Save Submitted Data to Table(s) Action Properties
- Save Data
- After submit action
Specify the action to take after the submitted data has been saved.
- Target page
Specify the target page.
- Use transactions
Should all of the SQL statements be wrapped inside a transaction? For example, if your Dialog has a Repeating Section so that some of the data is inserted into a 'header' table, and the data from the 'Repeating Section' is inserted into a 'detail' table, the record inserted into the 'header' table will be automatically deleted if an error occurs while entering data into the 'detail' table. Transactions are not supported for .dbf tables. Not all SQL databases support transactions.
- Display debugging info
Specify if the SQL statements (for SQL tables), or Xbasic code (for .dbf tables) should be shown. Note: If the 'After submit action' is set to redirect, then you will not see the debugging information (unless there is an error), because control will be redirected to the target page.
- Debugging information placeholder
Specify where debugging information should be shown. If you are working in an application that uses Panels, you will typically put a placeholder in the Panel to show debugging information in the appropriate panel. Set to <Default> for the default placement of debugging information.
- Global errors placeholder
Specify where global errors (if a commit error that is not specific to a particular field) should be displayed. If you are working in an application that uses Panels, you will typically put a placeholder in the Panel to show Global errors in the appropriate panel. Set to <Default> for the default placement of global errors.
- After Save Confirmation
- Show a fade out message after record save
Specify if a confirmation message should be shown after a record is saved. Note that the message will not be shown if the action redirects to another page.
- Message text
Specify the text of the confirmation message. This setting appears once the 'Show a fade out message after record save' property is checked.
- Placeholder id where message is to be shown
Specify the name of the placeholder where the confirmation message should be shown. To add a placeholder to the component select the [Placeholder] control in the 'Other Controls' section of the toolbox. This setting appears once the 'Show a fade out message after record save' property is checked.
- Message duration
Specify the duration of the message in milliseconds. For example, 2000 is 2 seconds. This setting appears once the 'Show a fade out message after record save' property is checked.
- Message style
Specify the style for the message. 'Default' will style the message based on the current component style. 'None' will not apply any style. You can add your own styling to the message text itself. This setting appears once the 'Show a fade out message after record save' property is checked.
- Client-side Events
- After save
Specify the name of a Javascript function to call after the server-side event that saves the data has completed. The function gets passed as an 'e' object that contains certain properties, including 'recordWasSaved' which is true or false. Note: Event will not fire if the action redirects to another page.
- Data to pass to client side event
You can populate the 'e' object that is passed to the client-side 'After save' event with information that is available on the server.
- After save succeeded Javascript
Specify the Javascript to execute if the save succeeded. You can use this property as an alternative to specifying the 'After save' Javascript function.
- After save failed Javascript
Specify the Javascript to execute if the save failed. You can use this property as an alternative to specifying the 'After save' Javascript function.
- Server-side Events
- BeforeRecordInsert Function
- AfterRecordInsert Function
- BeforeRecordUpdate Function
- AfterRecordUpdate Function
- BeforeRecordDelete Function
- AfterRecordDelete Function
- AfterSectionRowRefresh Function
- onSQLError Function
Fires when a SQL error occurs after attempting a CRUD operation. Allows you to intercept the error message returned by the database and return a friendlier message.
- Geography Fields
- Geocode record
When record is saved should the record be geo-coded? i.e. should a latitude/longitude value be computed for the address?
- Location fields ('Geography' or 'Geometry type fields)
When record is saved should a 'location' field (i.e. a 'Geography' or 'Geometry' field) be updated if a longitude or latitude field was edited.
- Refresh List Controls
- Refresh List Controls
After data is edited, specify if there are any List controls on the component that you want to refresh so that the data in the List controls reflect the edits that were saved.
- List controls to refresh
Specify the ids of the List controls you want to refresh.
- Store Current Location Information
- Store location information when record is saved
You can optionally store the location (latitude/longitude) in fields in the record you are editing. The location information is submitted when the Ajax callback is made. To submit location information when the 'Submit' button is pressed, the .Submit() method takes a special flag. For example: submit(",",{getLocationData:true})
- Latitude field
Specify the field where the latitude value should be stored.
- Longitude field
Specify the field where the longitude value should be stored
- Update location field
Specify if the table has a Geography/Geometry field that should be updated.
- Location field name
Brings up a dialog that lets you select the location field to be updated. If the field dialog does not show all of the fields in the table, go to the 'Data Binding' pane and click the 'Refresh Table Information' button.
- Store data for which operation types
Specify if the current location information should be stored only when inserting a new record, or when Inserting and Updating a record.
Using the 'Save Submitted Data to Tables' Action in Connection With Security
This guide builds on the 'Validate Web Security Values' action guide. This first guide illustrated how to set up basic username and password capabilities in a component. When a user creates a username and password they sometimes type in additional data to submit to the server. For example, this data might be the users phone-number or first name and/or family name. The 'Save Submitted Data to Table(s)' action can be used to save this data to a separate table from the user's security data. The 'UserName' field can also be used to link both tables, so that the non-security related data can be loaded securely at a later point.
Build the Component in the Validate Web Security Values Guide
Go to the Validate Web Security Values guide and build the entire component.
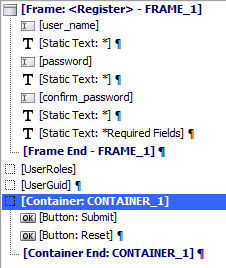
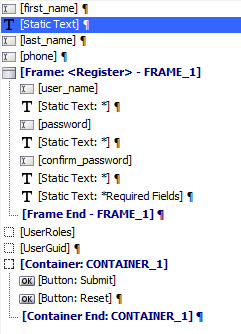
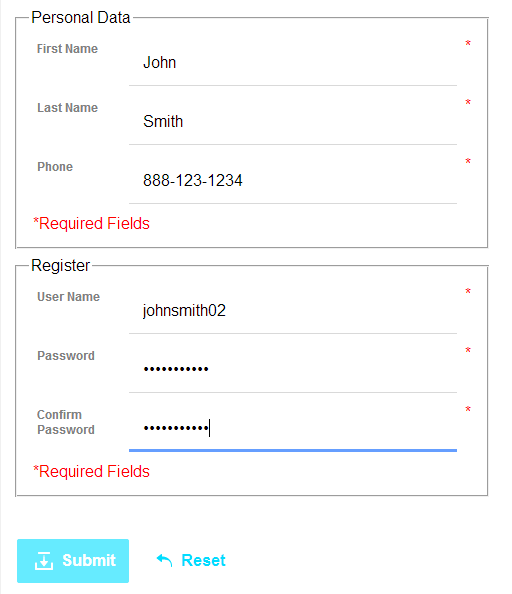
The component should look like this:
Change The Security Table Type to SQL
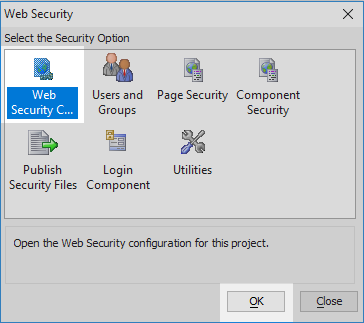
On the 'Web Projects Control Panel' click on the 'Web Security' button.

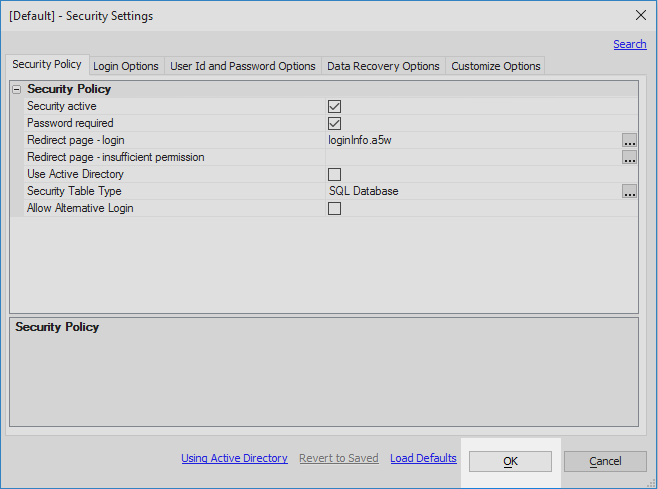
Select 'Web Security Configuration' and click OK.
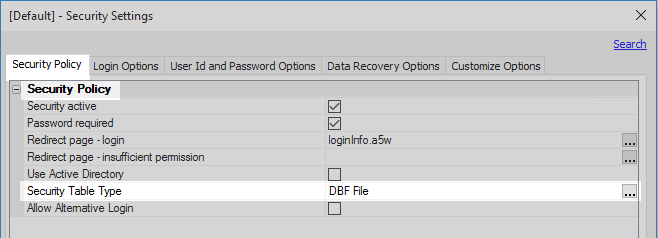
Open the 'Security Policy' tab and click on the [...] button next to the 'Security Table Type' setting.
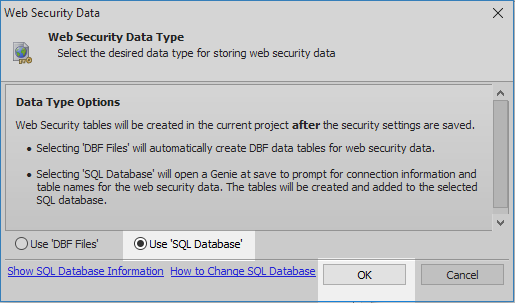
Select the "Use 'SQL Database'" radio button and click OK.
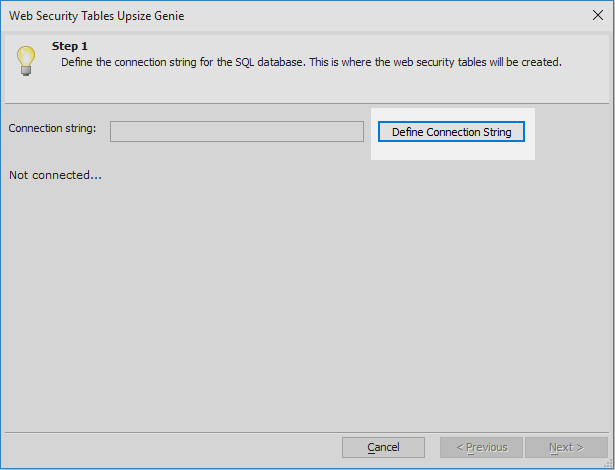
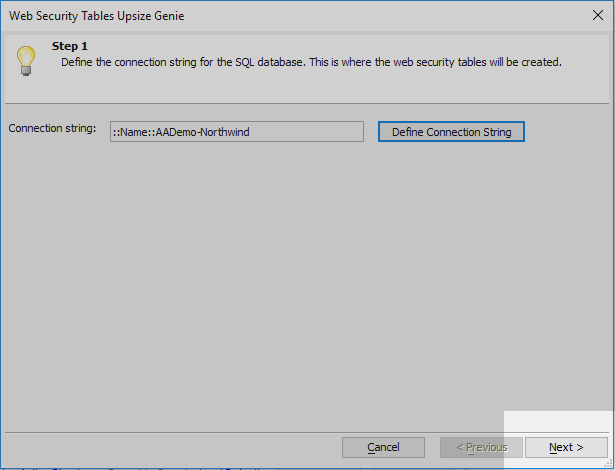
Click OK to close the 'Web Security Configuration' page. A 'Web Security Tables Genie' will appear.
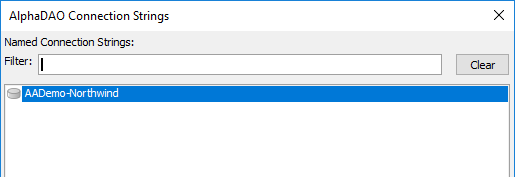
Click the 'Define Connection String' button.
Click the "Create 'AADemo-Northwind' demo connection string" hyperlink.
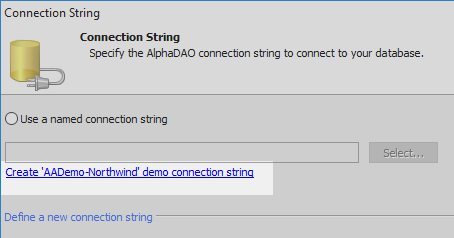
In the 'Demo Connection String' dialog select one of the two options and click the "OK - Create a named connection string called 'AADemo-Northwind'" button.

The connection string will be created.
In the Connection String dialog select the 'Use a named connection string' radio button and click the 'Select' button.
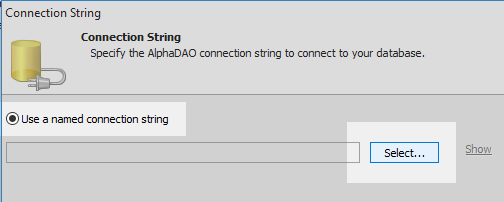
Highlight the 'AADemo-Northwind' connection string and click OK and OK again.
In the Web Security Tables Genie click the 'Next >' button.
Click next again to use the default tables to store the security fields. You can define new table names here as well.
Minor Adjustments to Security Controls
Open the UX Component that you built using the Validate Web Security Values guide. On the UX Controls page of the component highlight the [password] textbox control.
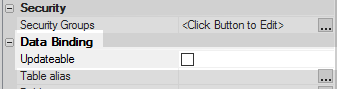
In the properties list on the right scroll down to the 'Data Binding' section and uncheck the 'Updateable' property checkbox.
 It will be necessary to set the fields generated from the password, confirm_password, UserRoles and UserGuid controls as unbound during the 'Data-Binding' part of this guide. In order to be able to do this, these controls can not be marked as 'Updateable' in their individual 'Data Binding' sections on the UX Controls page properties list.
Highlight the [confirm_password] textbox in the controls tree and uncheck the control's 'Updateable' checkbox.
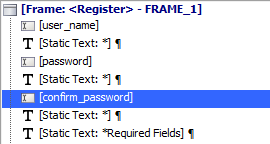
Uncheck the 'Updateable' property checkboxes for the [UserRoles] and the [UserGuid] hidden controls.
Add a Personal Data Section to the Component
On the UX Controls page open the 'Data Controls' menu. Click on the [TextBox] option to add a textbox control to the page. Give the control the name and label of 'first name'.
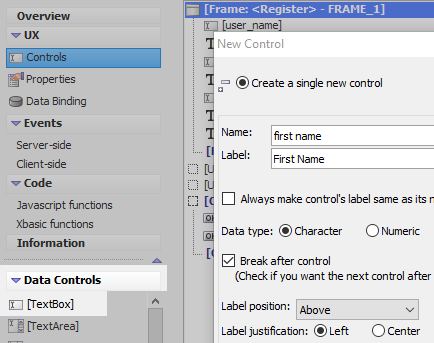
Highlight the first_name control and click on the double up arrow in the toolbar to move the control to the top of the controls tree.

In the properties list on the right, in the 'Field Properties' section, click the [...] button next to the 'Validation Javascript' property.
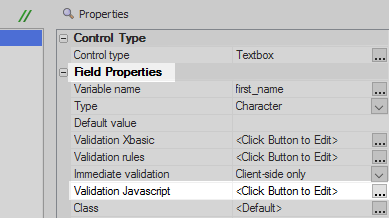
Add the following code to the client side validation for the first_name control. Click OK.
if(data==''){ return 'First Name is Required'; } else { return false; };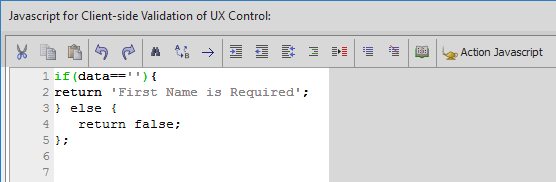 This is some simple client-side validation that will require the user to enter a first name.
With the first_name control still highlighted, go back to the 'Data Controls' menu and add a second [TextBox] control to the component. Give this control the name and label 'last name'.
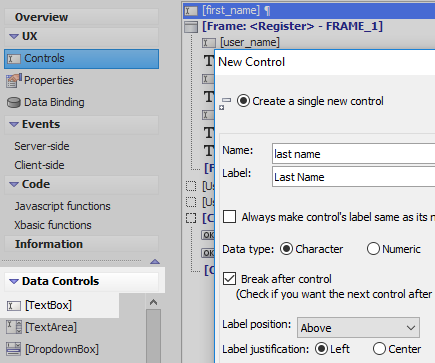
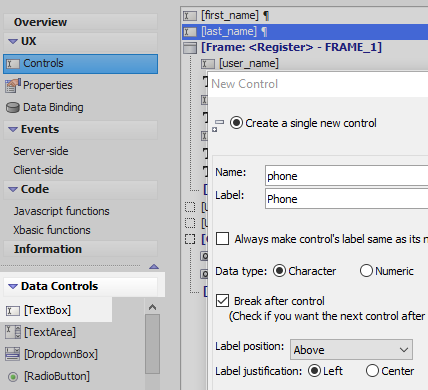
Highlight the 'last_name' field and add a third [TextBox] control to the component. Give this control the name and label of [phone].
Highlight the [first_name] field. Open the 'Other Controls' menu and click on the [Static Text] control to add some static text control underneath the [first_name] control.
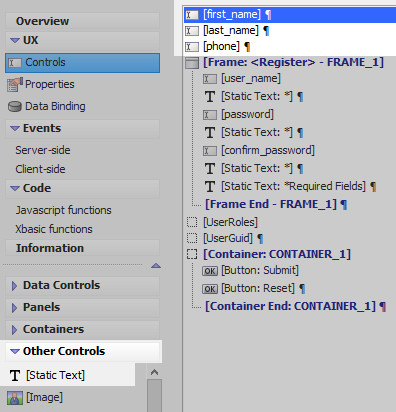
Highlight the static text control in the controls tree.
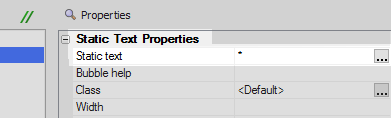
In the properties list on the right set the 'Static text' property to be an asterix '*'.
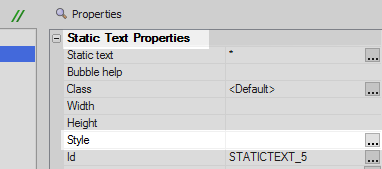
Click the [...] button next to the 'Style' property.
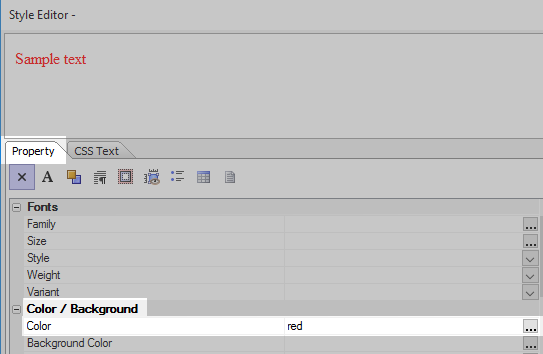
In the 'Style Editor' set the 'Color' property to be 'red' and click OK.
Place [Static Text] controls underneath the [last_name] and [phone] controls. Set the 'Static text' property of both controls to be '*' and set the 'Style' property's 'Color' setting to be 'red' as well.
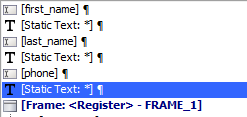
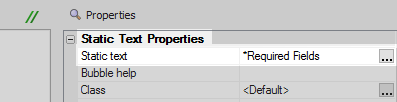
Add a forth [Static Text] control, underneath the static text asterix under the [phone] control. Set the 'Static text' property of this control to read '*Required Fields' and set the control's 'Syle' property's 'Color' to be 'red'.
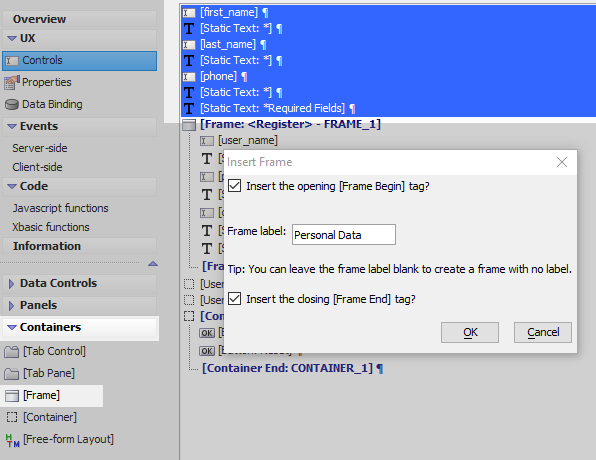
Highlight all of the most recently added controls. Open the 'Containers' menu and click on the [Frame] option to add a frame container around the controls. Give the Frame the name 'Personal Data'.
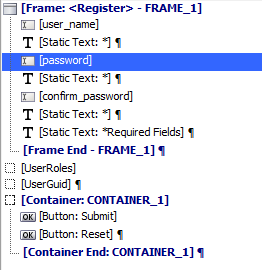
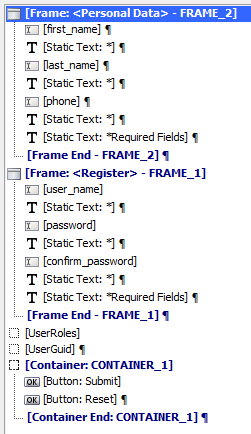
The complete controls tree:
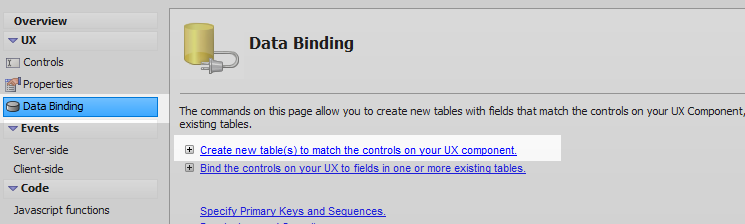
Data Binding
In the UX Builder's main menu open the 'Data Binding' page and click the 'Create new table(s) to match the controls on your UX component' hyperlink.
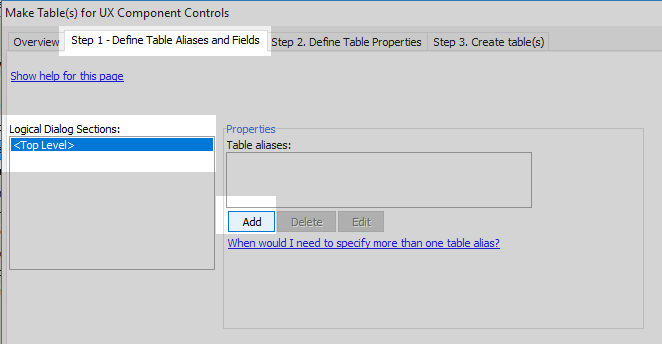
Open the 'Step 1 - Define Table Aliases and Fields' tab. In the 'Logical Dialog Sections' highlight the <Top Level> section. Click the 'Add' button in the section's 'Properties' area.
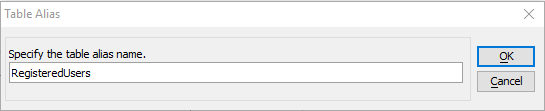
Name the new table alias 'RegisteredUsers'.
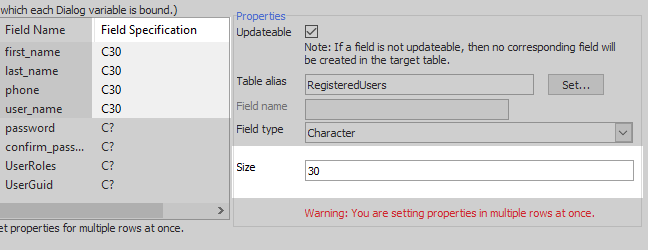
View the 'Fields in Logical Section'. Hold down the 'Shift' button and click first on the 'first_name' field and then the 'user_name' field to highlight the 'first-name', 'last_name', 'phone', and 'user_name' fields.
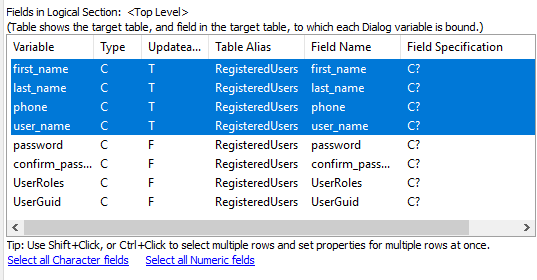
In the field 'Properties' area on the right click the 'Set...' button next to the 'Table alias' textbox. Select the 'RegisteredUsers' alias.
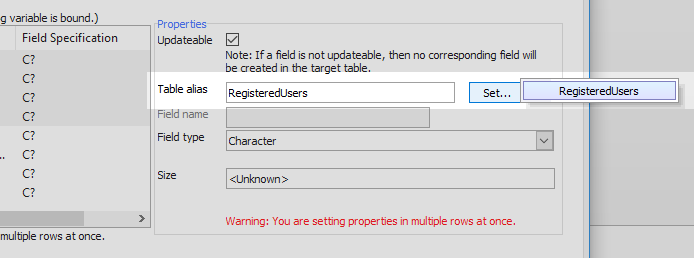
Set the 'Size' of all of the controls to be '30' characters.
Open the 'Step 2. Define Table Properties' tab. In the 'Table Aliases' tree highlight the 'RegisteredUsers'
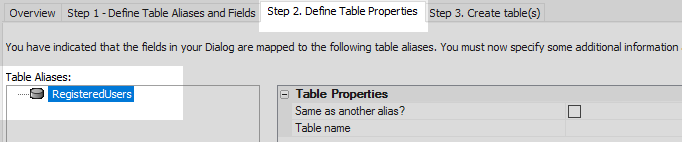
In the 'Table Properties' on the right set the 'Table name' to read 'RegisteredUsers'.

In the 'Global Table Properties' click the dropdown button next to the 'Table type' property. Select SQL.

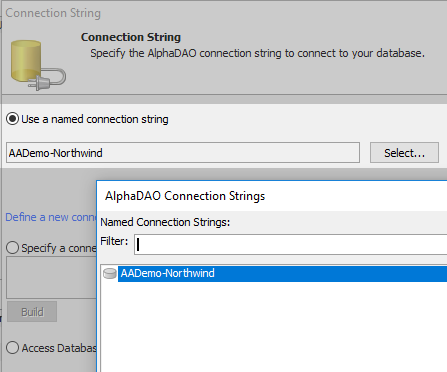
Click the [...] button next to the 'Connection string' property.

Click the 'Used a named connection string' radio button and click the 'Select...' button. Define a connection to the 'AADemo-Northwind' database. Click OK
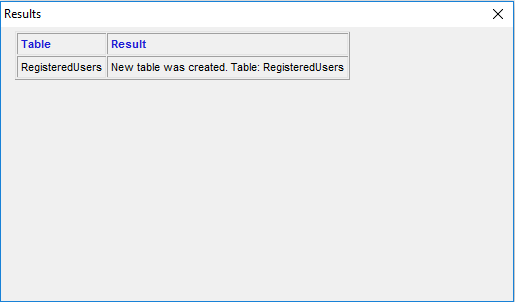
Open the 'Step 3. Create table(s)' tab. Click the Create table(s) button.
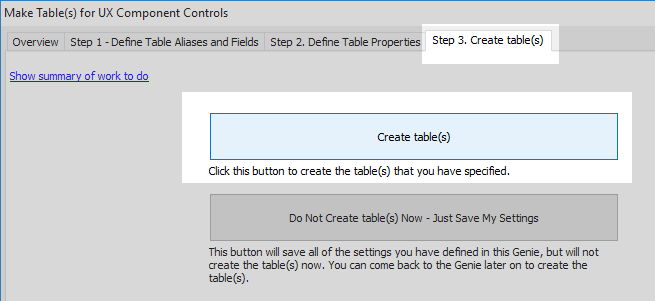
The table will be created. Click Close.
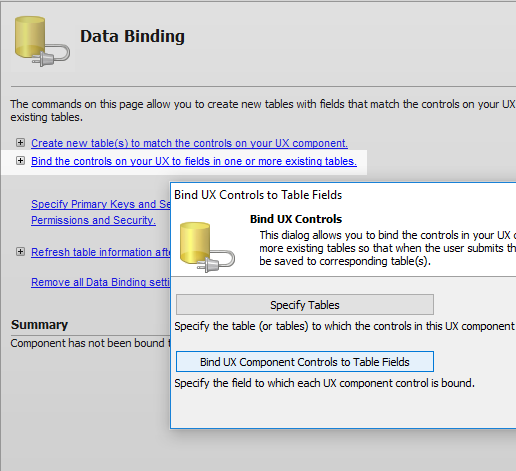
On the 'Data Binding' page click the 'Bind the controls on your UX o fields in one or more existing tables' hyperlink; then click the 'Bind UX Component Controls to Table Fields' button.
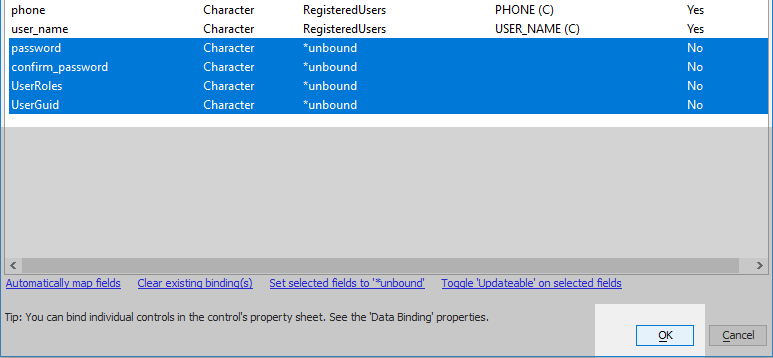
The 'Bind Controls to Fields' dialog will open. Hold down the 'Shift' key and click with the mouse on both the 'password' field and the 'UserGuid' field to highlight the 'password', 'confirm_password', 'UserRoles', and 'UserGuid' fields. Click the 'Set selected fields to '*unbound' hyperlink at the bottom of the dialog.
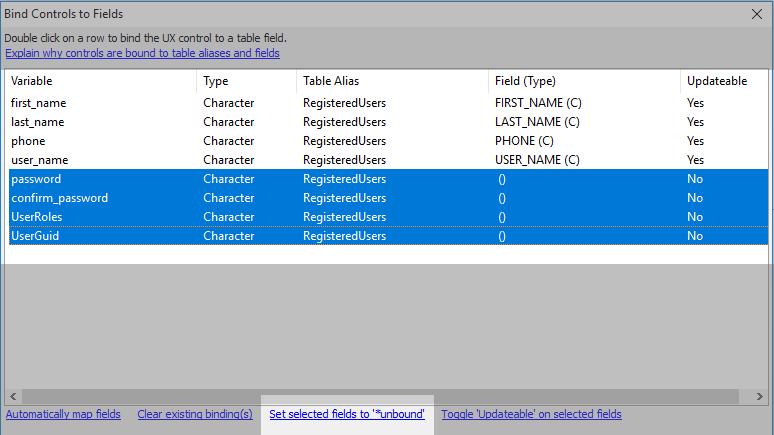
Click OK and OK again.
Implement the 'Save Submitted Data to Tables' Action
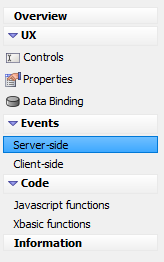
Expand the 'Events' menu and open the 'Server-side' page.
You should already have defined three events in the Server-Side Events list. Highlight the 'afterDialogValidate' event.
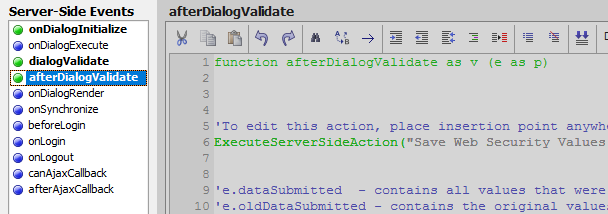
Place the mouse cursor inside the 'afterDialogValidate' event definition. above the previously defined 'Save Web Security Values' action. Click the 'Action Scripting' button in the toolbar.

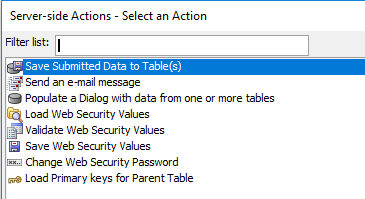
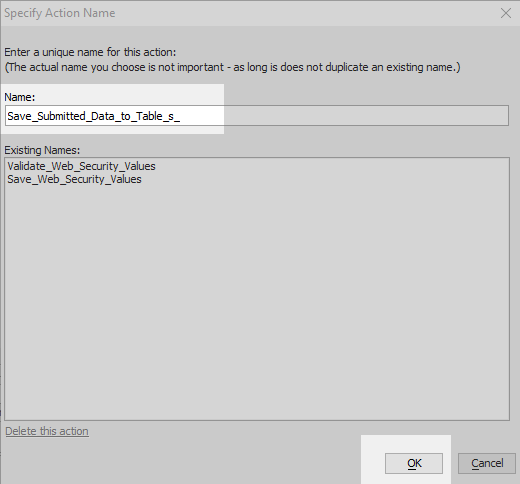
In the 'Select an Action' dialog highlight the 'Save Submitted Data to Table(s)' action and click OK.
Specify the action's name and click OK.
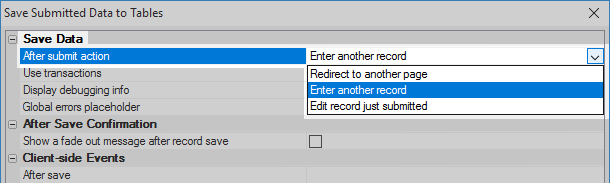
In the 'Save Submitted Data to Tables' property settings click the dropdown next to the 'After submit action' property in the 'Save Data' section. Select the 'Enter another record' option and click OK.
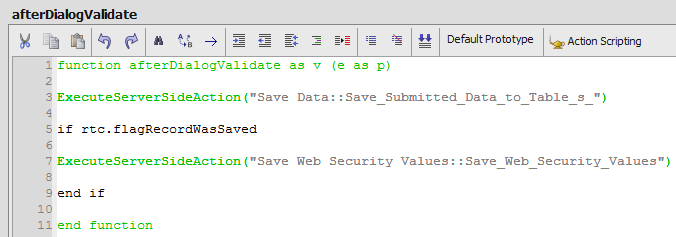
In the afterDialogValidate definition add the following code around the 'Save Web Security Values' action.
if rtc.flagRecordWasSaved
end if
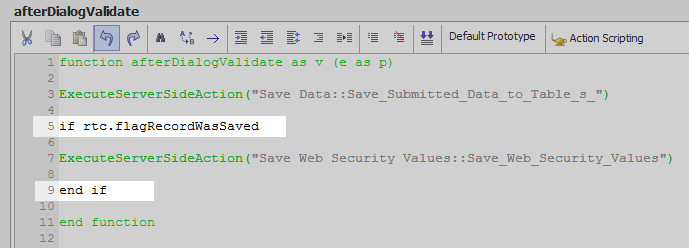 This will save the data to the registered users table. If you look at the variables exposed by the action, there is one variable that exposes a flag to indicate that the record was saved. This will be false if the data was not saved for some reason. We don't want to save the security data if the personal data was not saved. If the flag is true then the security data can be saved.
The afterDialogValidate definition should look like this:
Run the component in Working Preview and register some example users, filling in both the Personal Data section and the Security section. Then Click 'Submit'. If there are no validation errors the new user's data should now have been saved to the new 'RegisteredUsers' table.
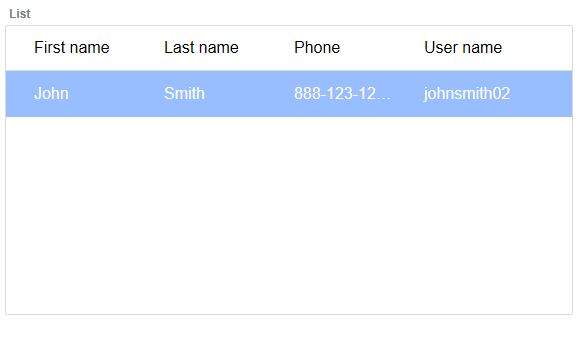
Viewing the Entered Personal Data
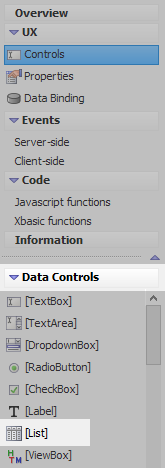
Create a new UX Component. In the UX Builder on the UX Controls page open the 'Data Controls' menu. Click on the [List] option to add a list control to the component.
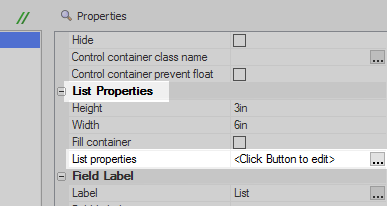
Highlight the list control. Scroll down the properties list on the right and click the [...] button next to the 'List properties' property. The List Builder will open.
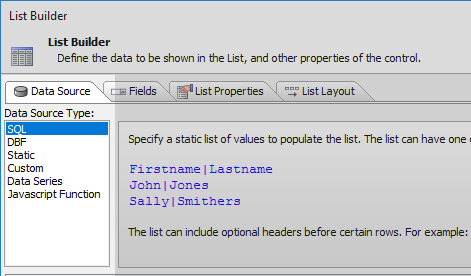
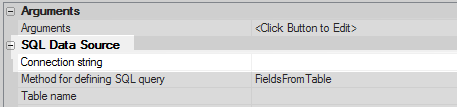
On the Data Source pane set the 'Data Source Type' to be 'SQL'.
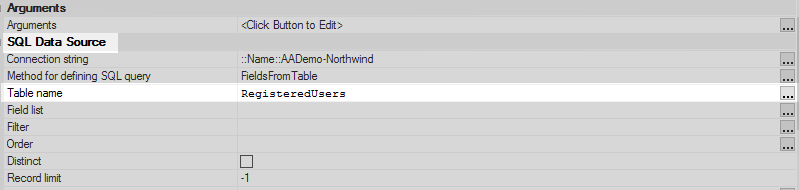
Click the [...] button next to the 'Connection string' property.
Create a connection string to the AADemo-Northwind database.

Click the [...] button next to the 'Table name' property. In the 'Select Table' dialog highlight the 'RegisteredUsers' table and click OK.
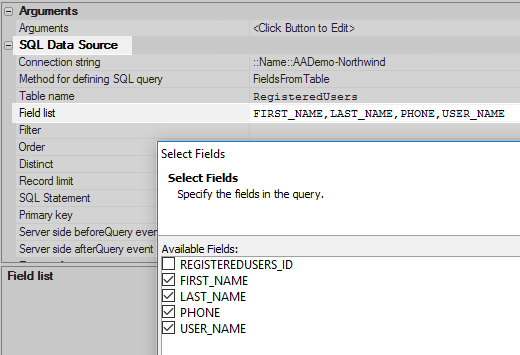
Click the [...] button next to the 'Field list' property. Check the 'FIRST_NAME', 'LAST_NAME', 'PHONE', and 'USER_NAME' fields. Click OK.
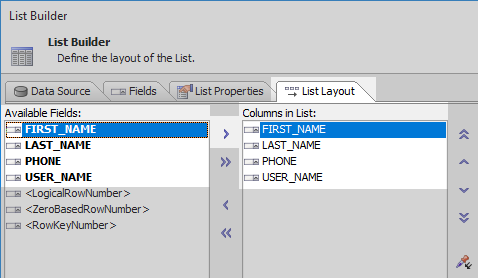
Click to open the List Layout pane. Use the blue > arrow to move the FIRST_NAME, LAST_NAME, PHONE, and USER_NAME fields from the 'Available Fields' list to the 'Columns in List'. Click OK to close the list builder.
Run the component in Live Preview. The list should display the personal data that was saved to the 'RegisteredUsers' table.
See Also